Published on 2022-06-24 by Sergey Ivanychev
Faster PySpark Unit Tests

TL;DR: A PySpark unit test setup for pytest that uses efficient default settings and utilizes all CPU cores via pytest-xdist is available on GitHub.
Spark is an excellent framework for massively parallel computation. As with every software system, the data pipelines written in Spark require thorough testing. Every engineer that has ever written a unit test that involved Spark computation has noticed that those typically perform much slower than ones testing Pandas logic.
In this article, we provide you with battle-tested best practices and good defaults on how to write a faster Spark unit test that utilizes 100% of your CPU and RAM.
Disclaimer: This article uses the pytest unit testing framework. When I mention specific Java options, you can put them in the configuration step of the SparkBuilder separated by a space:
.config(
    'spark.driver.extraJavaOptions',
    '-Dsome.option=true -Dother.option=false'
)
Configure Your Spark Session Wisely
Use one executor
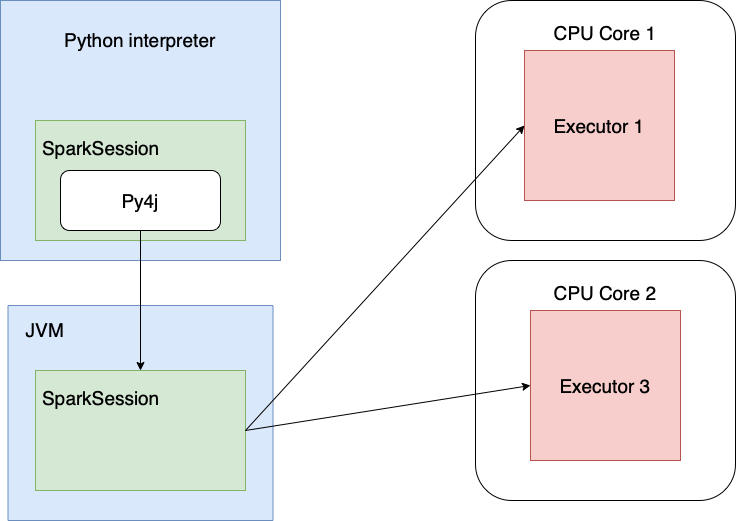
Let’s see how PySpark works when run locally:

Unit tests don’t involve crunching gigabytes of data stored in multiple partitions. The number of Spark calls, on the other hand (manipulation with the tables, writes, and DataFrame manipulations), is quite high. This means that the most CPU overhead you encounter in unit tests is spent on the Python-to-JVM (Java Virtual Machine) interop.
In this case, having more than one executor (=1 CPU core) per session is not necessary as there’s not much data to
crunch, but it still occupies some CPU. We can tell Spark to use one core by specifying 'local[1]' when creating a
session.
SparkSession.builder
  .master('local[1]')
Override default partitioning
The default value for spark.sql.shuffle.partitions is 200 as of version 3.2.1. This is a good default for big data, but since there’s not much local data anyway, you spend more overhead iterating over the partitions after the shuffle than actually doing computation. Limiting this number to 1 drastically improves performance.
.config("spark.sql.shuffle.partitions", "1")
# In case you're using Delta
.config('spark.databricks.delta.snapshotPartitions', '2')

# Java options
# -Ddelta.log.cacheSize=3
If you’re using Delta as a storage format you might need to override some of its defaults as well.
During the reading of the transaction log, Delta repartitions it, and the spark.databricks.delta.snapshotPartitions
setting defines the number of
partitions (here is the config used in the Delta project
itself).
Java option -Ddelta.log.cacheSize=3 reduces the memory footprint
by limiting the Delta log cache:
.config('spark.ui.showConsoleProgress', 'false')
.config('spark.ui.enabled', 'false')
.config('spark.ui.dagGraph.retainedRootRDDs', '1')
.config('spark.ui.retainedJobs', '1')
.config('spark.ui.retainedStages', '1')
.config('spark.ui.retainedTasks', '1')
.config('spark.sql.ui.retainedExecutions', '1')
.config('spark.worker.ui.retainedExecutors', '1')
.config('spark.worker.ui.retainedDrivers', '1')
Here we tell Spark that there’s no need for the Spark progress bar or Spark UI during unit test execution (though it might be helpful for debugging unit tests) and that it shouldn’t track the history of the jobs. This reduces RAM usage and doesn’t spin up the local HTTP server with the UI.
.config('spark.driver.memory', '2g')

# Java options:
# -XX:+CMSClassUnloadingEnabled -XX:+UseCompressedOops
In local mode, the Spark driver shares its memory with its executors (just the one, in our case). You should fix the RAM expectations upfront. This is essential if you want to tell if this threshold is reached when your pipeline evolves. Setting this parameter also helps assess how much memory is consumed in total when running unit tests in parallel. ( We’ll come back to this later).
The -XX:+CMSClassUnloadingEnabled option allows the JVM garbage collector to remove unused classes that Spark generates
a lot of
dynamically. This wins back some RAM.
If you’re not planning to use more than 32G of RAM in Spark, -XX:+UseCompressedOops will do no harm and will return to
you a few megabytes of
memory. This setting
tells JVM to use 32-bit addresses instead of 64.
Don’t Create a Spark Session Unless You Need To
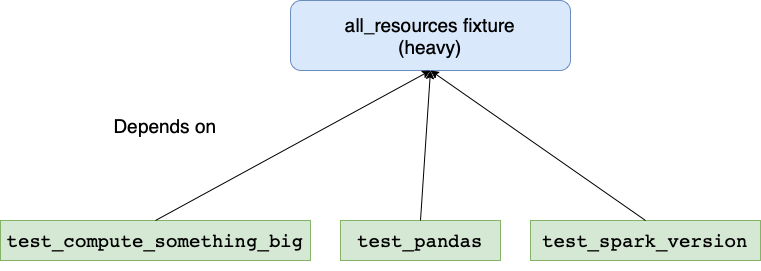
A common pattern for writing unit tests is to have a single god-like fixture that sets up all the resources (
including the Spark session) and is then used in all tests implicitly via the setting autouse=True:
@pytest.fixture(scope='session', autouse=True)
def all_resources():
  spark = get_spark_session()
  mock_some_objects()
  data_dir = prepare_test_data()

  yield (spark, data_dir) # yielding tuple resources.

  # Cleanup.
  shutil.rmtree(data_dir)
  spark.stop()

# ...

def test_compute_something_big(all_resources):
  spark = all_resources[0]
  assert spark.table(...).count() == 42

# Here we don't need Spark session, this test might
# work much faster if executed on its own.

def test_pandas(all_resources):
  data_dir = all_resources[1]
  df = pd.read_csv("...")
  expected_types = ...
  assert df.dtypes == expected_types

# This test doesn't need Spark session either,
# but it still implicitly created due to autouse=True

def test_spark_version():
  import pyspark
  assert pyspark.__version__ == '3.2.1'
This approach works, but in your project there may be tests that don’t need Spark (or other expensive resources) to run.
When you’re implementing some Pandas logic and running test_pandas iteratively, it starts up pretty slowly because it
depends on all_resources, which spins up a Spark session every time you launch test_pandas.

We can do better.
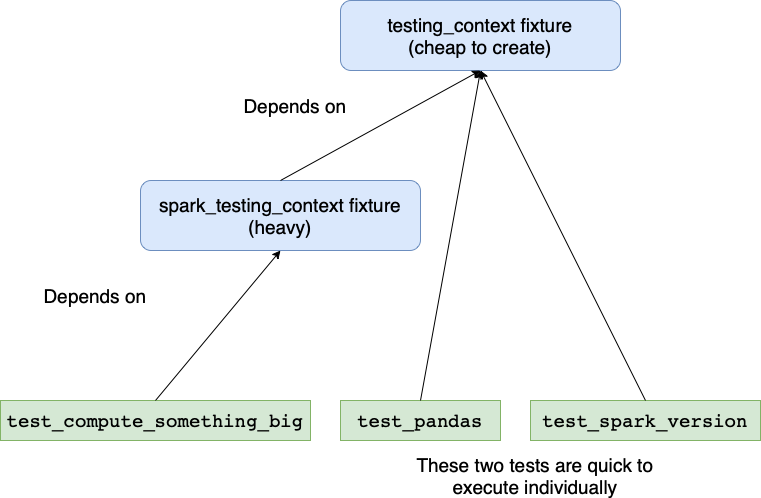
pytest is excellent at dealing with your unit test dependencies through fixtures. To allocate the resources your test needs, you can decouple the fixtures and use only those that are required by your test:
TestingContext = collections.namedtuple("data_dir")
SparkTestingContext = collections.namedtuple("test_ctx spark")

# This is cheap to execute, so autouse=True is fine
@pytest.fixture(scope='session', autouse=True)
def testing_context():
  mock_some_objects()
  data_dir = prepare_test_data()

  yield TestingContext(data_dir)
  shutil.rmtree(data_dir)

# The spark_testing_context "wraps" the testing_context.
# Test can require only testing_context, in this case
# Spark session is not created at all!
@pytest.fixture(scope='session')
def spark_testing_context(testing_context):
  spark = get_spark_session()

  yield SparkTestingContext(testing_context, spark)

  spark.stop()
Here we introduced testing_context and spark_testing_context fixtures, where the second depends on the first. The expensive initialization of the Spark session is moved to a different fixture that does not auto-initialize. This makes the 2nd and the 3rd tests evaluate much faster:
def test_pandas(testing_context):
  data_dir = testing_context.data_dir
  df = pd.read_csv("...")
  expected_types = ...
  assert df.dtypes == expected_types

def test_spark_version():
  import pyspark
  assert pyspark.__version__ == '3.2.1'

Use all of your cores
When running vanilla pytest tests implemented this way, only 1 to 2 CPU cores will be utilized (the first because of GIL and the second because Spark lives in a separate JVM process that communicates with the Python interpreter via py4j).
This means a lot of unrealized potential if you have a CPU with ≥ 4 cores. How can we benefit from many cores when running tests? There’s already an excellent library: pytest-xdist.
pytest tests_folder/
With this module and two simple command-line options, you can run your pytest test cases on multiple cores:
pytest tests_folder/ \
  # Spawn 2 processes for testing
  -n 2\
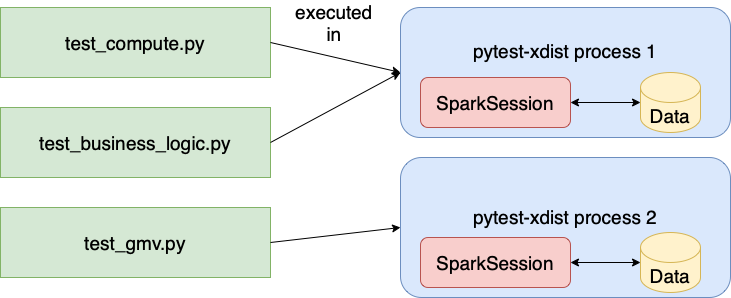
  # The tests are distributed by file across processes.
  # Given a file, all tests in it are executed in a single process.
  --dist loadfile

This setup can lead to problems, however, when your tests involve Spark. Session-scoped fixtures are created once per process; in the example above, at most two Spark sessions are created. If configured poorly, the sessions will interfere with each other in a data race, so we need to carefully configure them. To solve this problem, pytest provides the tmp_path_factory session-scoped fixture, which generates a temporary directory to use in tests — a different directory in each pytest-xdist process.
At this point, let's list possible places where issues might happen.
Metastore path
When running locally, Spark uses the Apache Derby database. This database uses RAM and the local disc to store files. Using the same metastore in all processes can lead to concurrent modifications of the same table metadata. This can lead to errors (e.g. unknown partitions) and undesired interference between tests.
To avoid it, use a separate metastore in each process. This can be achieved via setting the -Dderby.system.home
directory:
-Dderby.system.home={tmp_path_factory.mktemp('derby')}
Test output data path
Do not write Spark outputs from different processes to the same output folder, as this can lead to data races and test
interference. Use tmp_path_factory to set up the output folder in the session-scoped fixture. In Spark, we can omit to
specify the output path while calling the write operation like saveAsTable
df.write.saveAsTable("test_db.some_table")

In this case, the data is saved to the folder set up by spark.sql.warehouse.dir configuration. You should use separate paths in different processes as well.
```python
.config('spark.sql.warehouse.dir',
        tmp_path_factory.mktemp('warehouse'))
Checkpoint location
If you use a checkpoint operation in your code, you should use the same technique to set up output locations.
spark.sparkContext.setCheckpointDir(
  tmp_path_factory.mktemp('checkpoints')
)
Delta setup
Delta Lake is straightforward to set up with Spark. The
configure_spark_with_delta_pip function does a great job at setting up the SparkBuilder to work with Delta. However,
this approach doesn’t work when executing tests in parallel as configure_spark_with_delta_pip doesn’t find the JAR with
Delta in separate processes and tries to download them to the same temporary location.
To my knowledge, this location can’t be configured, so that means we need to manually configure Delta. This isn’t hard, though:
.config('spark.sql.extensions',
        'io.delta.sql.DeltaSparkSessionExtension')
.config('spark.sql.catalog.spark_catalog',
        'org.apache.spark.sql.delta.catalog.DeltaCatalog')
.config('spark.jars', f'file://{delta_core_jar}')
delta_core_jar stores the path to the delta-core JAR file (which you can
download here). In my experience, this file isn’t too big, so it’s fine to
put it in your Git near the conftest.py and use a relative path to point Spark to it.
# conftest.py
delta_core_jar = str(
  pathlib.Path(__file__).parent / 'delta-core_2.12-1.1.0.jar'
)
Note: Use the same Delta JAR version as your delta-spark version. You should even write a unit test for that!
The final diagram:

Other notes
-
Use a profiler to find bottlenecks. pytest-profiling is a fantastic library that profiles your tests and generates an SVG with a call graph for the percentage of time spent in every function. It’s very helpful to find slow tests or slow code reused across tests.
-
Profile your code at run time. If you want to attach to the already running code, py-spy is an excellent tool for the job.
-
Speed up tests collection step. Before executing the tests, pytest collects the tests to execute. This process might become slow due to heavy imports or expensive logic put in the module scope that gets executed during import. To find out what’s causing the issue, use the pytest-profiling library with pytest’s
--collect-onlyflag.
Conclusion
Check out the final PySpark unit tests setup here in GitHub. The techniques described in this article helped us to speed up Constructor’s test suite roughly 2x when running on an r5a.xlarge AWS instance equipped with 4 cores and 32G of RAM.
References
-
Some resources from Matthew Powers: an article on testing Spark applications and some handy Spark unit testing helpers
-
The latest Spark configuration options